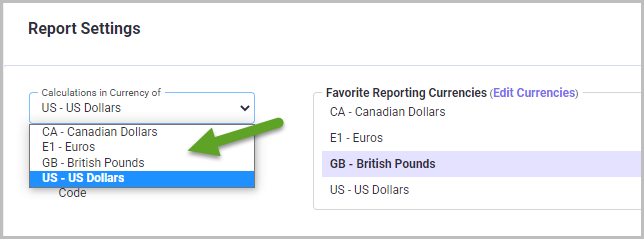
On the top left portion of this screen, you can select the currency you would like to use for cost calculations in the estimates using the ‘Calculations In Currency Of’ option. You can select the favorite currencies to use in the reports using the ‘Favorite Reporting Currencies’ option.
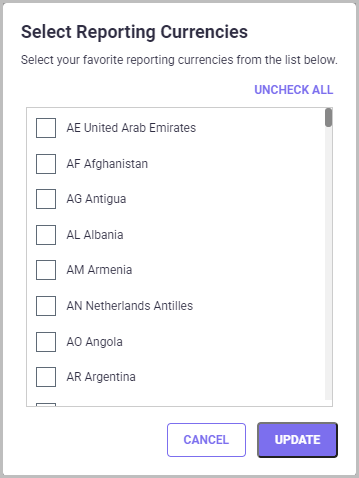
To select your favorite reporting currencies, click the "Edit Currencies" link next to the ‘Favorite Reporting Currencies’ box and on the Select Reporting Currencies pop-up screen (shown aboce), place a check in the box next to each currency you wish to have listed as your favorites, as shown below. Once you have chosen the currencies, click UPDATE to save and close the pop-up window.

This gives you the option to quickly change the currency of various reports, as it dis-plays only these favorite currencies instead of all currencies in the drop-down list for currency selections. In the above example, the favorite currencies listed are Canadian Dollars, British Pounds, and US Dollars. Therefore, when you generate reports such as Family Details reports, Portfolio/Strategy analysis reports, Pivot Table reports, etc., only the favorite currencies are displayed for easy selection.
This is also very helpful if you want to quickly see the costs in the local currency for any country/jurisdiction. For example, in the Family Details report, the costs in the estimate reports for all countries/jurisdictions in the family is by default in US$. However, sup-pose, you want to compare the costs in the estimate report for the European Patent Office with the fee schedule provided by your associate in EP which is in Euros; you can just change the currency to Euros by selecting Euros from the drop-down list of Family Details report.
To set the default currency to be used in the calculations and displayed in the reports, choose a country from the drop-down box labeled 'Calculations In Currency Of'. By de-fault, all currencies are listed in this drop-down list. By checking the FAV checkbox, the drop-down list will only show favorite currencies.
The lower portion of the Report Settings screen has the ‘Fiscal Year Settings’, as shown below, which helps you in reporting based on a fiscal year that begins on a date other than January 1st. There are two options under this setting: ‘Use Fiscal Year Settings’ to select/ deselect use of fiscal year settings in the reports and ‘Show Fiscal Period De-tails’ to define the fiscal period within the fiscal year for use in the report.
To report based on a fiscal year that begins on a date other than January 1st, check the ‘Use Fiscal Year Settings’ checkbox and indicate the month, date and year in the corre-sponding fields for ‘Fiscal Year 20XX starts on’ under the ‘Fiscal Year Settings’. In sum-marizing costs annually, calculations will then use the fiscal year specified here for re-porting instead of calendar year. By enabling the Use Fiscal Year Settings, the date range in Portfolio Cost Analysis and Strategy Analysis will also be changed.
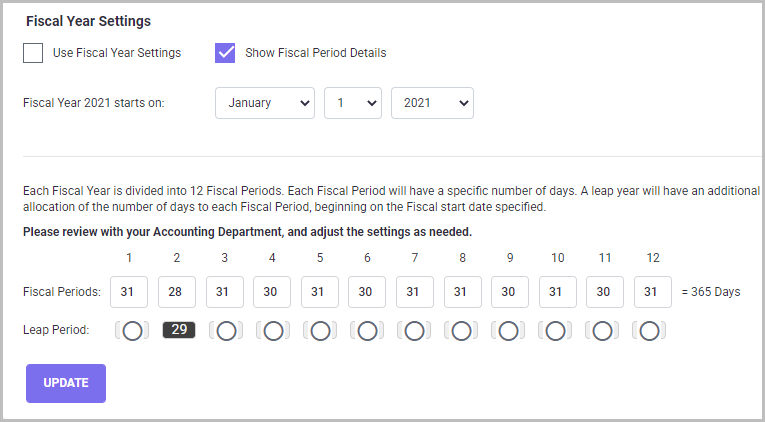
The ‘Show Fiscal Period Details’ checkbox allows you to define and customize fiscal year periods. A fiscal year is divided into 12 periods. You can define the length of the periods based on your requirement. By default, each fiscal period is same as the calen-dar month corresponding to the fiscal period, depending on the fiscal year start date. Therefore, the fiscal periods for a standard year (with 365 days) are either 31,30, or 28 days. However, for leap years which have 366 days, the fiscal period corresponding to the February month is 29 days. Therefore, based on the selected month, the fiscal year calendar will be generated. If the selected year is a leap year then you can choose a leap period for the same. For example, as shown in Figure above, if the fiscal year starts on 1st April 2019 and ends in March 2020, the first fiscal period which corresponds to April 2019 is 30 days and so on; since 2020 is a leap year, it has fiscal period 11 speci-fied as 29 days.
Finally, you can save and export the Fiscal settings defined here in Excel format using the Export button and save in any folder on your system for later use. Re-use it again in the program by using the Import option at a later point.